Kotlin BLE Demo: Send a Command and Display the Device Response
This page is based on Kotlin BLE Demo-251218.txt. It shows how to use Kotlin + Android BLE GATT to connect to an OP-BT / OP-BTS device, send the command BaudTran,9600,N,8,1, and display the response (for example: OK,VER=01.00) in the UI.
1. Environment Setup
- IDE: Android Studio (recommended with JDK 11 / Java 11)
- Create a new project:
- Name:
OPManagerDemo - Template: Empty Activity
- Language: Kotlin
- Minimum SDK: Android 8.0 (API 26) or higher (recommended for BLE demos)
- Name:
Source Code
The complete source code for this demo is available on GitHub:
- GitHub Repository: https://github.com/zenovate-team/OPManagerDemo-kotlin
You can clone the repository and open it directly in Android Studio:
git clone https://github.com/zenovate-team/OPManagerDemo-kotlin.git
cd OPManagerDemo-kotlin
2. Demo Overview
2.1 Features
- Scan nearby BLE devices
- Show devices (name + MAC address) in a list
- Connect to a selected device via BLE GATT
- Send the command
BaudTran,9600,N,8,1to the device - Receive and display the device response, e.g.
OK,VER=01.00 - Show connection status, sent commands, and received data as logs in the UI
2.2 Libraries / APIs
- Bluetooth (BLE GATT):
BluetoothLeScannerBluetoothGatt/BluetoothGattCallbackBluetoothGattCharacteristic/BluetoothGattDescriptor
- Runtime permissions:
- AndroidX Activity Result API:
ActivityResultContracts.RequestMultiplePermissions
- AndroidX Activity Result API:
2.3 Protocol & UUID
-
Text command:
- Send:
BaudTran,9600,N,8,1 - Example response:
OK,VER=01.00
- Send:
-
GATT UUID config (16-bit / 32-bit / 128-bit are supported):
- Service UUID:
18F0 - Notification Characteristic UUID:
2AF0 - Write Characteristic UUID:
2AF1
- Service UUID:
3. Screenshots
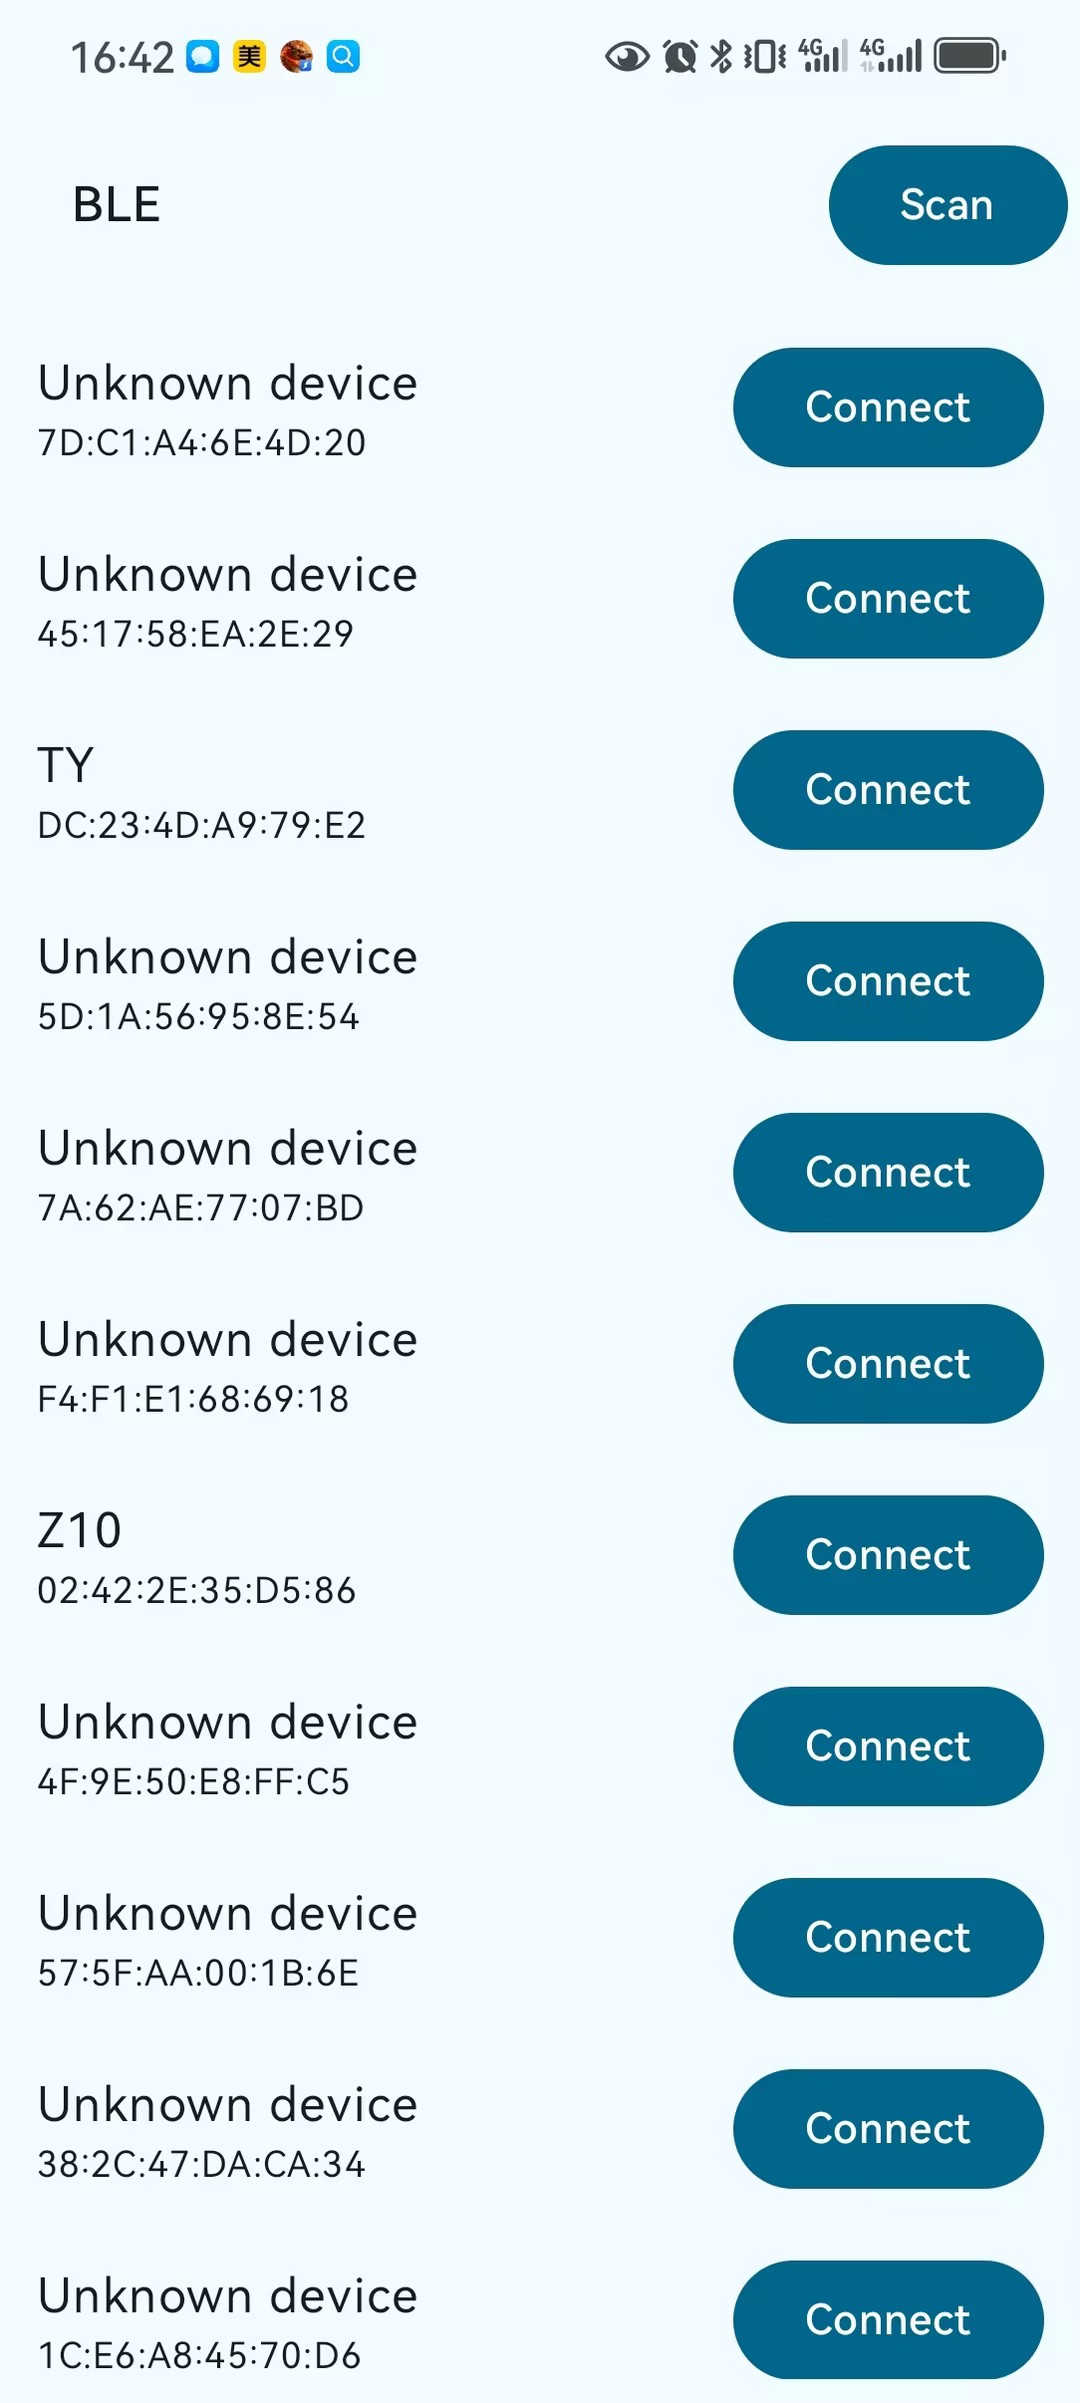
Device scan list screen
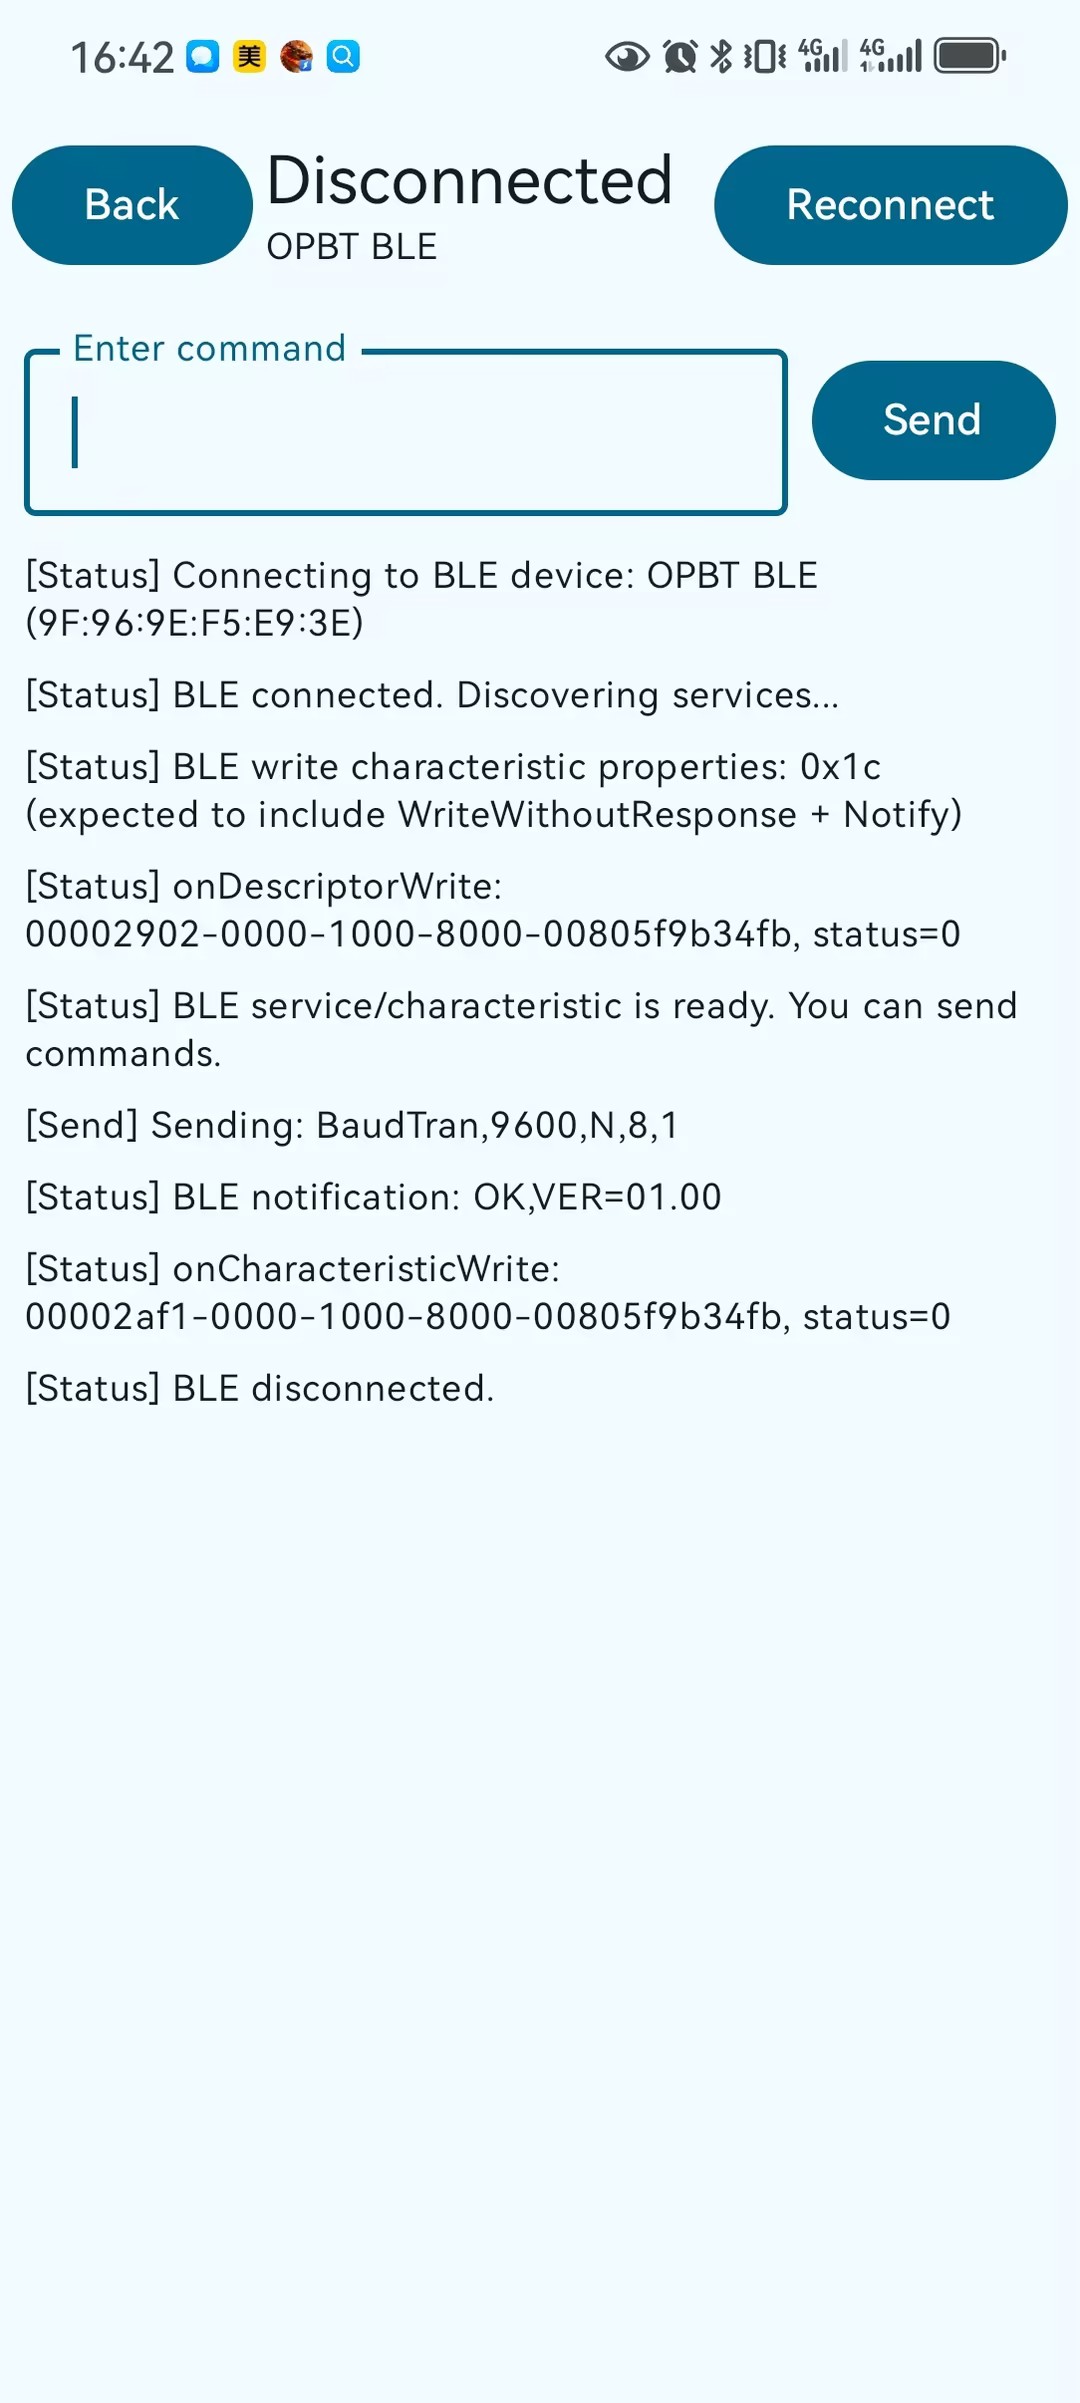
Command and response log screen
4. Android Permissions (AndroidManifest.xml)
Edit app/src/main/AndroidManifest.xml with content similar to:
<?xml version="1.0" encoding="utf-8"?>
<manifest xmlns:android="http://schemas.android.com/apk/res/android"
    xmlns:tools="http://schemas.android.com/tools">

    <!-- Bluetooth permissions (compatible with pre/post Android 12) -->
    <!-- Legacy Bluetooth/location permissions for Android 11 and below -->
    <uses-permission
        android:name="android.permission.BLUETOOTH"
        android:maxSdkVersion="30" />
    <uses-permission
        android:name="android.permission.BLUETOOTH_ADMIN"
        android:maxSdkVersion="30" />
    <uses-permission
        android:name="android.permission.ACCESS_COARSE_LOCATION"
        android:maxSdkVersion="30" />
    <uses-permission
        android:name="android.permission.ACCESS_FINE_LOCATION"
        android:maxSdkVersion="30" />

    <!-- New Bluetooth runtime permissions for Android 12+ -->
    <uses-permission
        android:name="android.permission.BLUETOOTH_SCAN"
        android:usesPermissionFlags="neverForLocation" />
    <uses-permission android:name="android.permission.BLUETOOTH_CONNECT" />
    <uses-permission android:name="android.permission.BLUETOOTH_ADVERTISE" />

    <!-- Bluetooth / BLE hardware capabilities (optional) -->
    <uses-feature
        android:name="android.hardware.bluetooth"
        android:required="false" />
    <uses-feature
        android:name="android.hardware.bluetooth_le"
        android:required="false" />

    <application
        android:allowBackup="true"
        android:dataExtractionRules="@xml/data_extraction_rules"
        android:fullBackupContent="@xml/backup_rules"
        android:icon="@mipmap/ic_launcher"
        android:label="@string/app_name"
        android:roundIcon="@mipmap/ic_launcher_round"
        android:supportsRtl="true"
        android:theme="@style/Theme.OPManagerDemo">
        <activity
            android:name=".MainActivity"
            android:exported="true"
            android:label="@string/app_name"
            android:theme="@style/Theme.OPManagerDemo">
            <intent-filter>
                <action android:name="android.intent.action.MAIN" />
                <category android:name="android.intent.category.LAUNCHER" />
            </intent-filter>
        </activity>
    </application>

</manifest>
Runtime permission requests are implemented in Kotlin using ActivityResultContracts.RequestMultiplePermissions (see next section).
5. Key Kotlin Code Snippets
The full source is in Kotlin BLE Demo-251218.txt. Below are only the key parts related to UUID config, connection, and sending the command:
object BleConfig {
    const val SERVICE_UUID_STR = "18f0"
    const val WRITE_CHAR_UUID_STR = "2af1"
    const val NOTIFY_CHAR_UUID_STR = "2af0"
    // Helper to convert 16-bit / 32-bit / 128-bit strings into UUID
}

class BleConnectionManager(private val context: Context) {
    // Fields: BluetoothManager, BluetoothAdapter, BluetoothGatt, writeCharacteristic ...

    fun connect(
        address: String,
        onStateChange: (ConnectionState) -> Unit,
        onLog: (ConnectionLog) -> Unit
    ) {
        // 1. Close previous GATT if any
        // 2. Get remote device by MAC address
        // 3. Connect with connectGatt(...)
        // 4. Discover services, find service/characteristic by UUID
        // 5. Enable notification (CCCD) on the write/notify characteristic
        // See full implementation in Kotlin BLE Demo-251218.txt
    }

    fun send(
        text: String,
        onLog: (ConnectionLog) -> Unit
    ) {
        // Append CRLF because many modules expect serial-like protocol
        val payload = text + "\r\n"
        // gatt.writeCharacteristic(writeCharacteristic)
        onLog(ConnectionLog(LogType.SEND, "Sending: $text"))
    }
}

@Composable
private fun ConnectionDetailScreen(
    device: BluetoothDeviceUi?,
    connectionState: ConnectionState,
    logs: List<ConnectionLog>,
    onBack: () -> Unit,
    onReconnect: () -> Unit,
    onSendCommand: (String) -> Unit
) {
    // Default command for this demo
    var commandText by remember { mutableStateOf("BaudTran,9600,N,8,1") }
    // UI shows: connection state, device name, command input, Send button, and logs list
}
6. How to Run
- Connect your Android phone to the PC with a USB cable and enable USB debugging on the device
- In Android Studio, click Run ▶ and choose your device
- After the app starts:
- Grant all requested Bluetooth / location permissions on first launch
- On the device list screen, tap Scan (top-right) to scan BLE devices
- Tap your OP-BT / OP-BTS device in the list to connect
- On the “Connection Detail” screen:
- Keep the default command
BaudTran,9600,N,8,1and tap Send - You should see logs for the sent command and the device response, e.g.
OK,VER=01.00
- Keep the default command